Creating a Moderated Self-Submission Process
This guide describes how to set up Islandora to accept content submissions from users and hold them in a moderation queue for editing and approval.
There are two possible approaches:
- Using the Content Moderation workflows, submitters will create Repository Item nodes themselves, which get put into Draft state. Repository staff then review, edit, and Publish those drafts. Or,
- Using the Webform module, submitters send in their thesis and some basic metadata. Repository staff will use the form to create the Repository Item on the submitter's behalf.
Content Moderation method
Modules
Enable the following modules:
- Workflow
- Content Moderation
- Content Moderation Notifications
- Content Moderation Bypass
- Content Moderation Dashhboard
Module Configurations
Each of the above modules must be configured to create the self-submission process.
Workflow configuration
- Configure Workflow at
/admin/config/workflow/workflows - Use the
+Add workflowbutton to create a new workflow - Label it something understandable like "Start as draft", and choose the workflow type
Content moderation - Configure States:
- These are the different states a submission can be in, the ultimate state being Published.
- The default states, Draft and Published, should suffice, but you can add more intermediate states like "Under review".
- If adding a new state, set it to "Default revision", and make sure they are in order.
- Configure Transitions:
- Transitions describe how content moves from one state to another. Transitions are executed by authorized users.
- The default states should suffice if only using the Draft and Published states, but you should create more transitions if you've added more states.
- "From" describes the initial state of the object before the transition is applied; "To" describes the state the object will be in after the transition.
- This workflow applies to:
- Under Content Types, select
Repository Item. - If you want to also subject Media submissions to review, select all applicable Media Types as well.
- Under Content Types, select
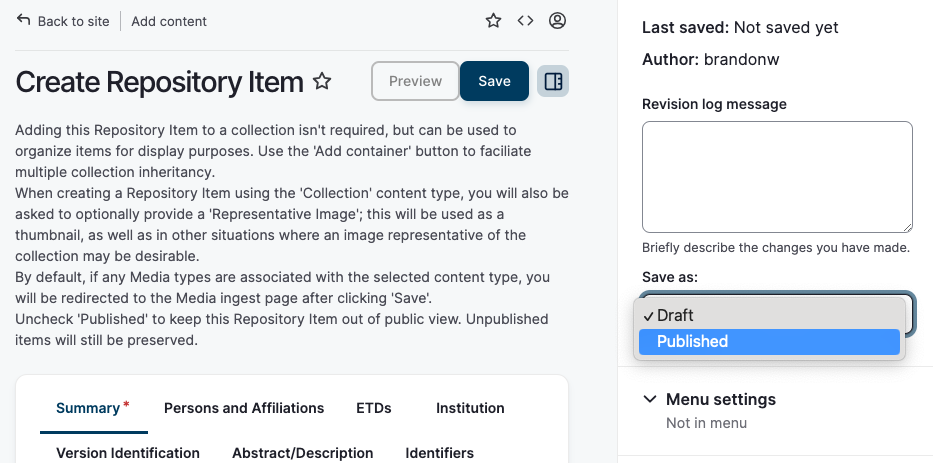
- Set Default Moderation State:
- When a Repository Item is submitted, it will automatically get the state you select here. Leave it at "Draft".
Content Moderation Notifications configuration
You can set up Notifications to send an email to the appropriate people when a submission undergoes a transition. For example, you might notify Reviewers when a new draft is submitted. Or you might notify the submitter when their submission is published, or if revisions are requested.
- Configure Content Moderation Notifications at
/admin/config/workflow/notifications/ - Create notifications for the kids of activities that you want people notified about. For example, a notification called "Notify Reviewer":
- Label: Notify Reviewer
- Workflow: Start As Draft (or whatever your workflow is named)
- Transitions: Create New draft
- Notifies the recipient when a new draft is created -- i.e. when a new submission is made
- Roles:
- If you check off a role, it means that all users with this role will be notified. If you want all potential reviewers to see this submission, then you should have a Reviewer role, and select it.
- Email the author?:
- Appropriate for transitions like "Revisions requested" or "Published", to notify the author that they have work to do or that their submission was accepted.
- Disable the site email address:
- By default, the module will send a message to the website owner's email address. Best to disable this.
- Adhoc email addresses:
- If you have specific users you want to receive the message, add them here.
- Email subject and Body:
- Write your email here.
- You can also use tokens (see the Browse Available Tokens link) to insert variables like the author name (
[node:author]), the submission title ([node:title]), etc.
Content Moderation Dashboard
Optional, and doesn't quite work easily out of the box. Provides a dashboard for each user displaying their submissions. This module is very barebones and requires you to create your own views, but has a lot of potential.
- Configure it at
/admin/config/people/moderation_dashboard - Redirect on login: If selected, all users will be directed to their
moderation-dashboardpage when they log in, at/user/[user ID number]/moderation-dashboard. - Pull chart.js from CDN:
- Turn this on at least initially, so that you can download the chart.js file. Otherwise, viewing the dashboard will just result in an error.
You will need to then configure the views that appear on the moderation dashboard. This has not yet been explored.
Roles and Permissions
Permissions must be well-configured in order for self-submission workflows to go smoothly.
Roles
Create the roles (admin/people/roles) that are appropriate to your workflow:
- A
Submitterrole for ingesters who require moderation - Optional: A
Reviewerrole for users who should be notified about new submissions so they can review them
Permissions
Set permissions for all submission activities (admin/people/permissions):
Roles permissions on transitions
Under Content Moderation, set the following permissions:
- “Use the Create New Draft transition":
- All roles that can create Repository Items, including Submitter
- “Use Publish transition”:
- All roles that are allowed to move things from Draft to Published.
- These should be reviewers, repository administrators, etc.
Bypassing the Draft state
You probably want certain roles to be able to submit directly to the repository without being moderated (e.g. Administrator, Site Administrator, Repository Administrator, Ingester). Content Moderation Bypass allows this.
Under Content Moderation Bypass, select appropriate roles for the permission “Bypass transition restrictions”.
View own unpublished content
Roles subject to workflow should be able to view their own unpublished content.
- Media: View own unpublished media (select applicable roles)
- Node: View own unpublished content (select applicable roles)
Allow Submitters to create content
Any new roles need to have basic permissions configured, including the ability to add new items to the repository.
- Under Node:
- Repository Item: Create new content
- Repository Item: Edit own content (if you want to allow this)
- Under Media:
- For each media type you want submitters to be able to ingest, check off the "Create new media" permission
- Create Media (general media creation permission)
Content Moderation Process
With the modules configured, this section describes how to work within a content moderation structure.
Ingesting content
Submitters
Users with the Submitter role have permission to ingest Repository Item content and submit it to the Draft state. When they create content, it is not published until someone with approval permissions publishes it.
Repository staff
Roles assigned permission to bypass the moderation states may ingest content without restrictions.
However: the default moderation state when creating content, even for those with the Bypass permission, is "Draft". If using these workflows, submitters wanting to publish directly must change this to "published" whenever they ingest content.
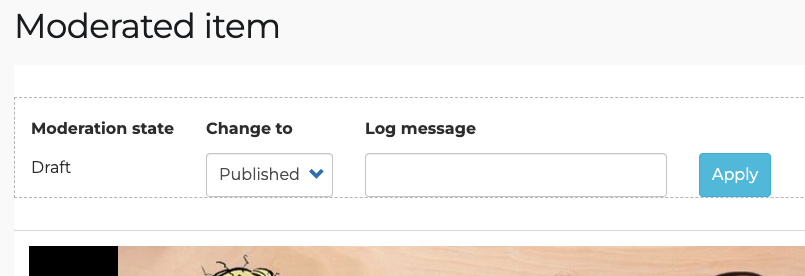
If the item was ingested to the "draft" state accidentally, it may be moved directly to "published" using the moderation block.
Webform method
Modules
- Webform
- Base Webform module
- Webform Attachment
- Allows submitters to attach files, eg PDFs
- Webform Node
- Optional; allows a Webform to be created as a page with your form embedded in it.
- Webform Submission Import/Export
- Optional; allows you to export (and import) submissions for your records.
- Webform UI
- Provides a user interface for you to manage webforms.
Creating a webform
- Go to
Structure -> Webforms, and click "Add a webform" - Give it a title (e.g. "Thesis submission") and descriptions, and a status (open or closed). Save.
- "Open" means it will accept submissions; "closed" means it will not.
- Add elements (fields) to your form:
- In the Webforms section, next to your form, click Build
- To add a new element, click Add Element and select the type.
- Choose the type of field relevant to its purpose; eg. for user email, use the Email field.
- Give your element a title and description, and save
- Be sure to include at minimum elements for:
- Title
- Author
- Date
- Abstract
- Submission file (attachment)
- Submitter contact information
- Also include any other fields that the repository staff will need to fully populate the metadata.
- Add emails and handlers to send notifications:
- Click the
Emails/Handlerstab - Add Email
- Fill out the details -- the recipient email address, subject, etc.
- Save
- Click the
- Create either a page with a link to your form, or create a menu link to your form.